Fog Forecasting for Photographers: The Dewpoint Spread Playbook
Learn to read weather signals and plan reliable fog shoots using dewpoint spread, VPD, and wind data.
Fog Forecasting for Photographers: The Dewpoint Spread Playbook
Catching fog isn’t about luck, it’s about reading the right signals. Most successful fog mornings follow a predictable pattern: cool, calm air that’s nearly saturated, with perfect timing around sunrise. Learn to interpret three key weather signals: dewpoint spread, VPD, and wind - and you can plan fog shoots with confidence.
This guide walks through the complete workflow in PhotoWeather, including how to use the built-in Dense Fog template and create a more sensitive “Fog or Mist Likely” variant.
You’ll need an account to access the charts and templates. Sign up free and add your first locations.
Why Fog Forms (A Photographer’s Perspective)
Understanding fog formation helps you predict where and when it will appear:
- Radiation fog appears after clear, calm nights when the ground cools and air temperature drops to meet the dew point around sunrise
- Advection or coastal fog occurs when moist air moves over a colder surface, often near the ocean
- Valley and upslope fog develops where cool air pools in low terrain or is pushed upslope and chills
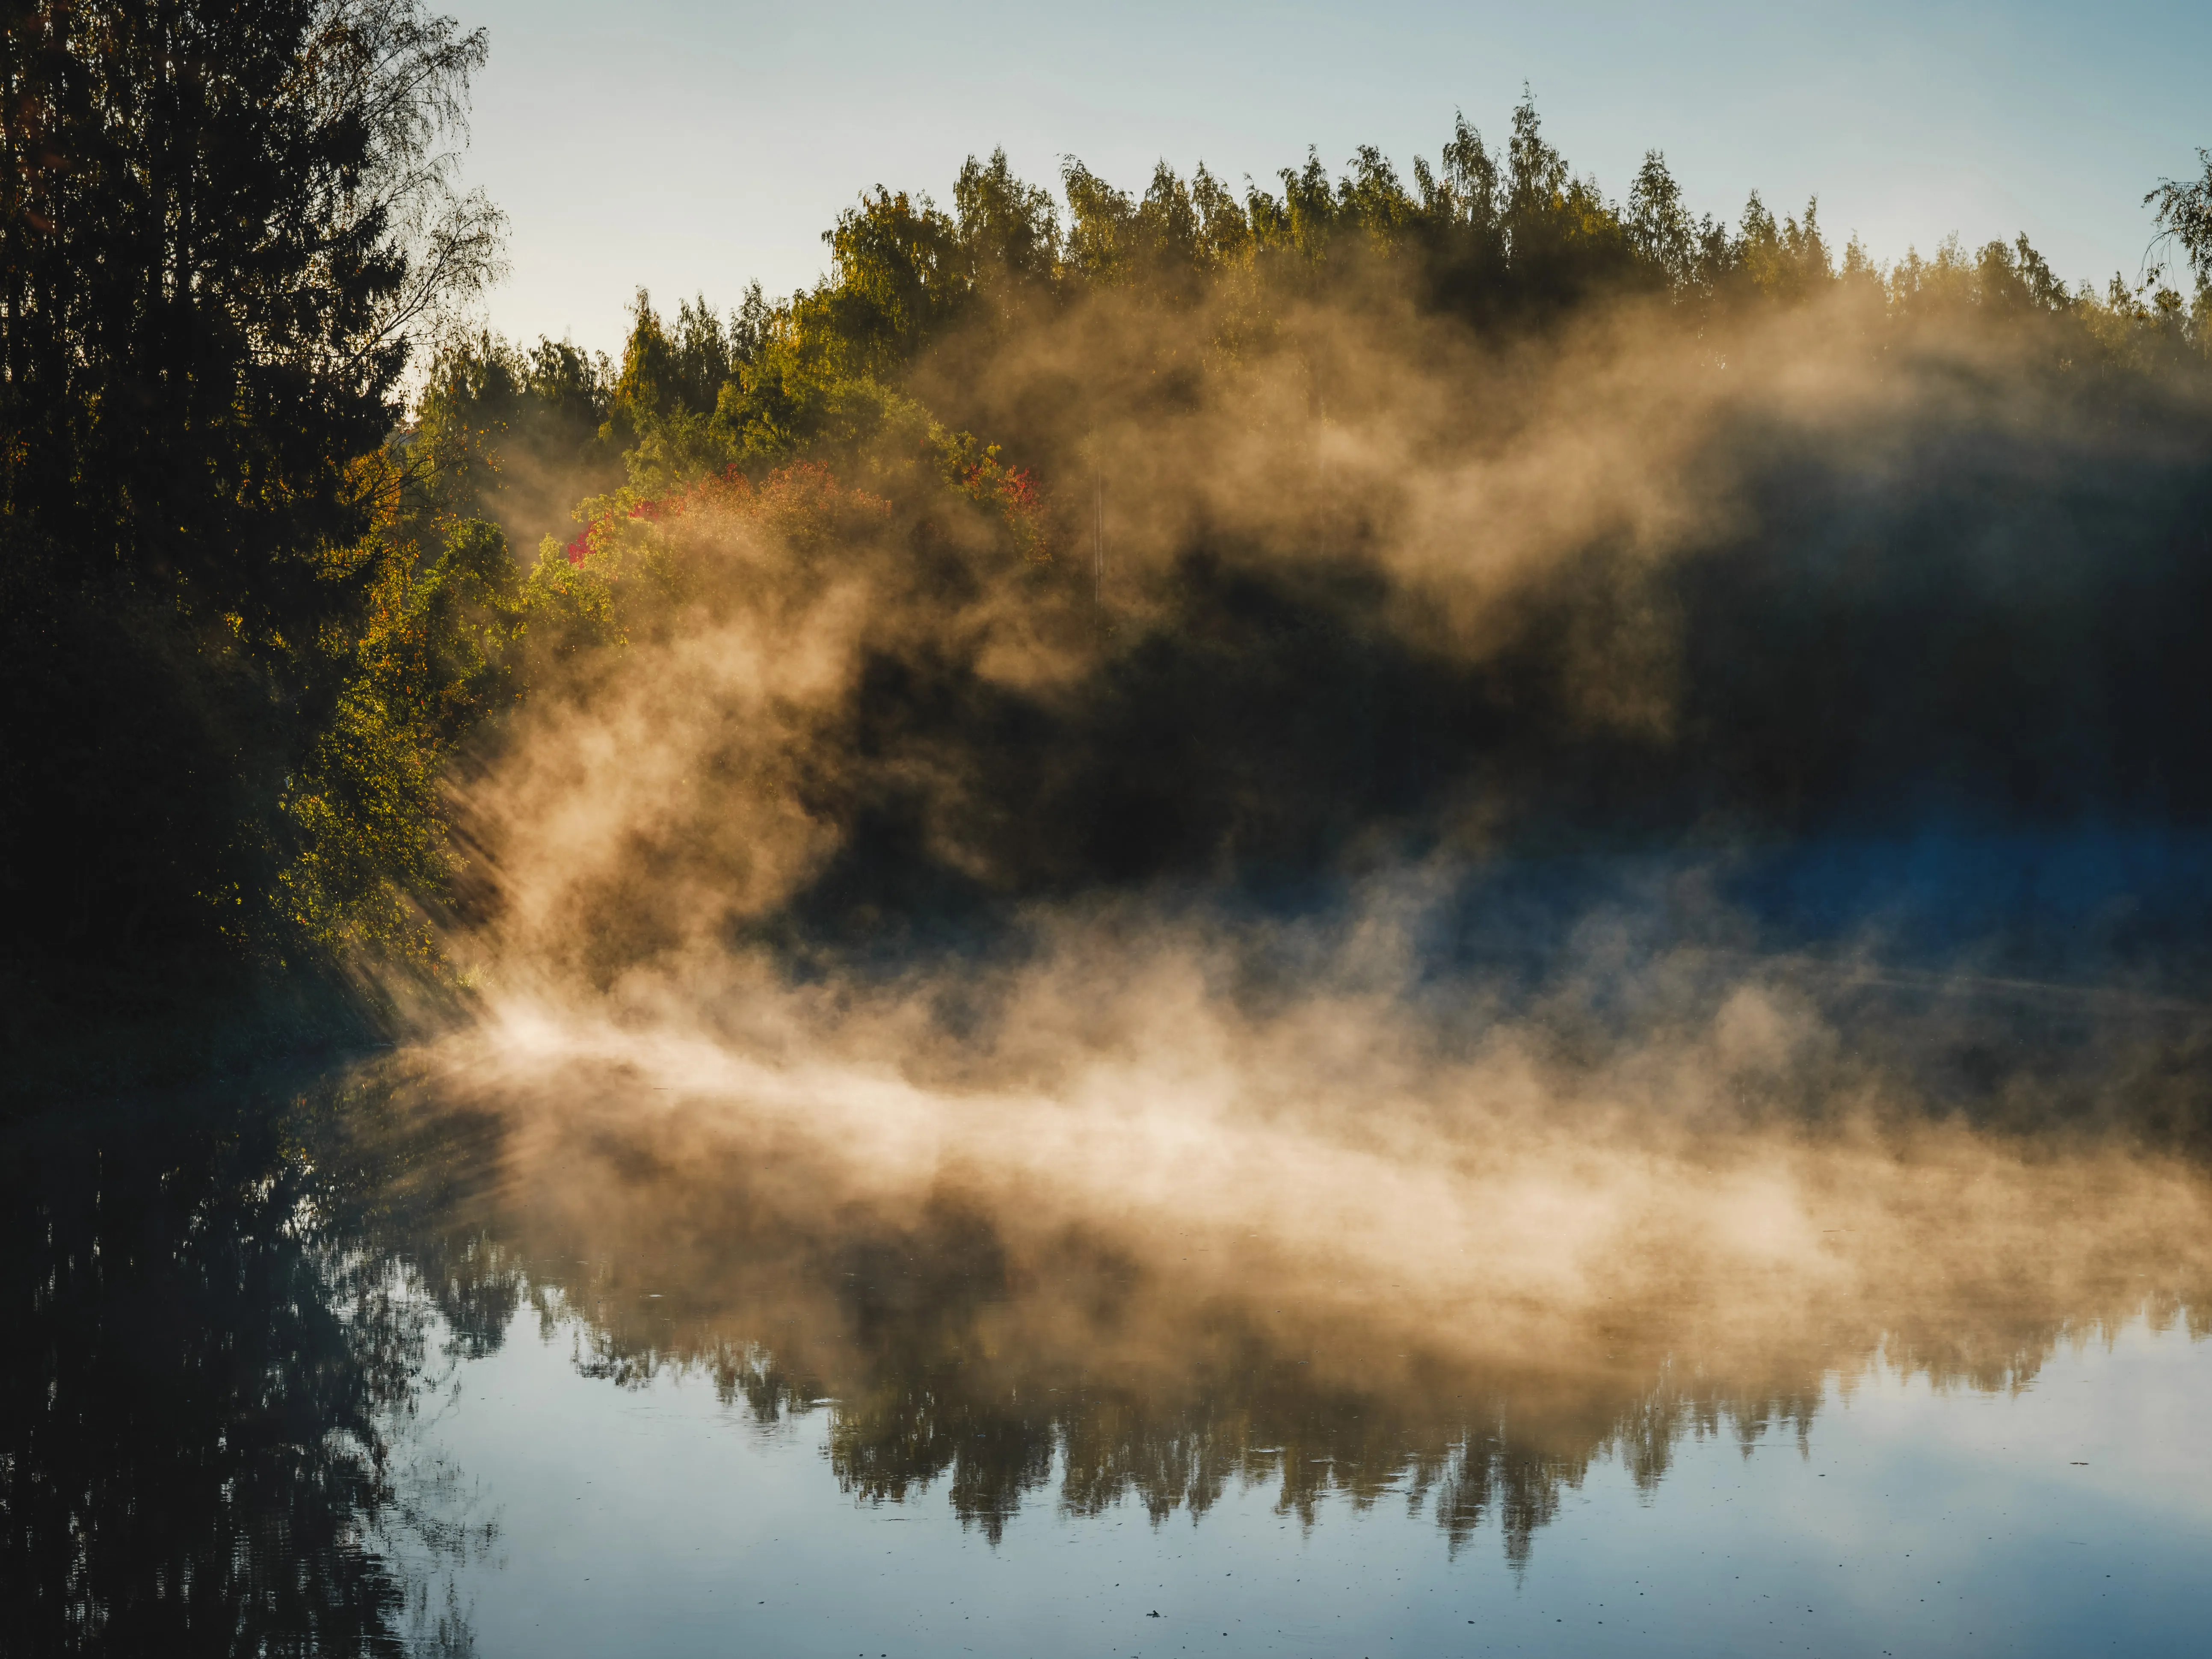
You’re looking for near-saturated air with minimal mixing—this creates the separation, layers, and soft light that makes fog photography magical.
The Three Critical Weather Signals
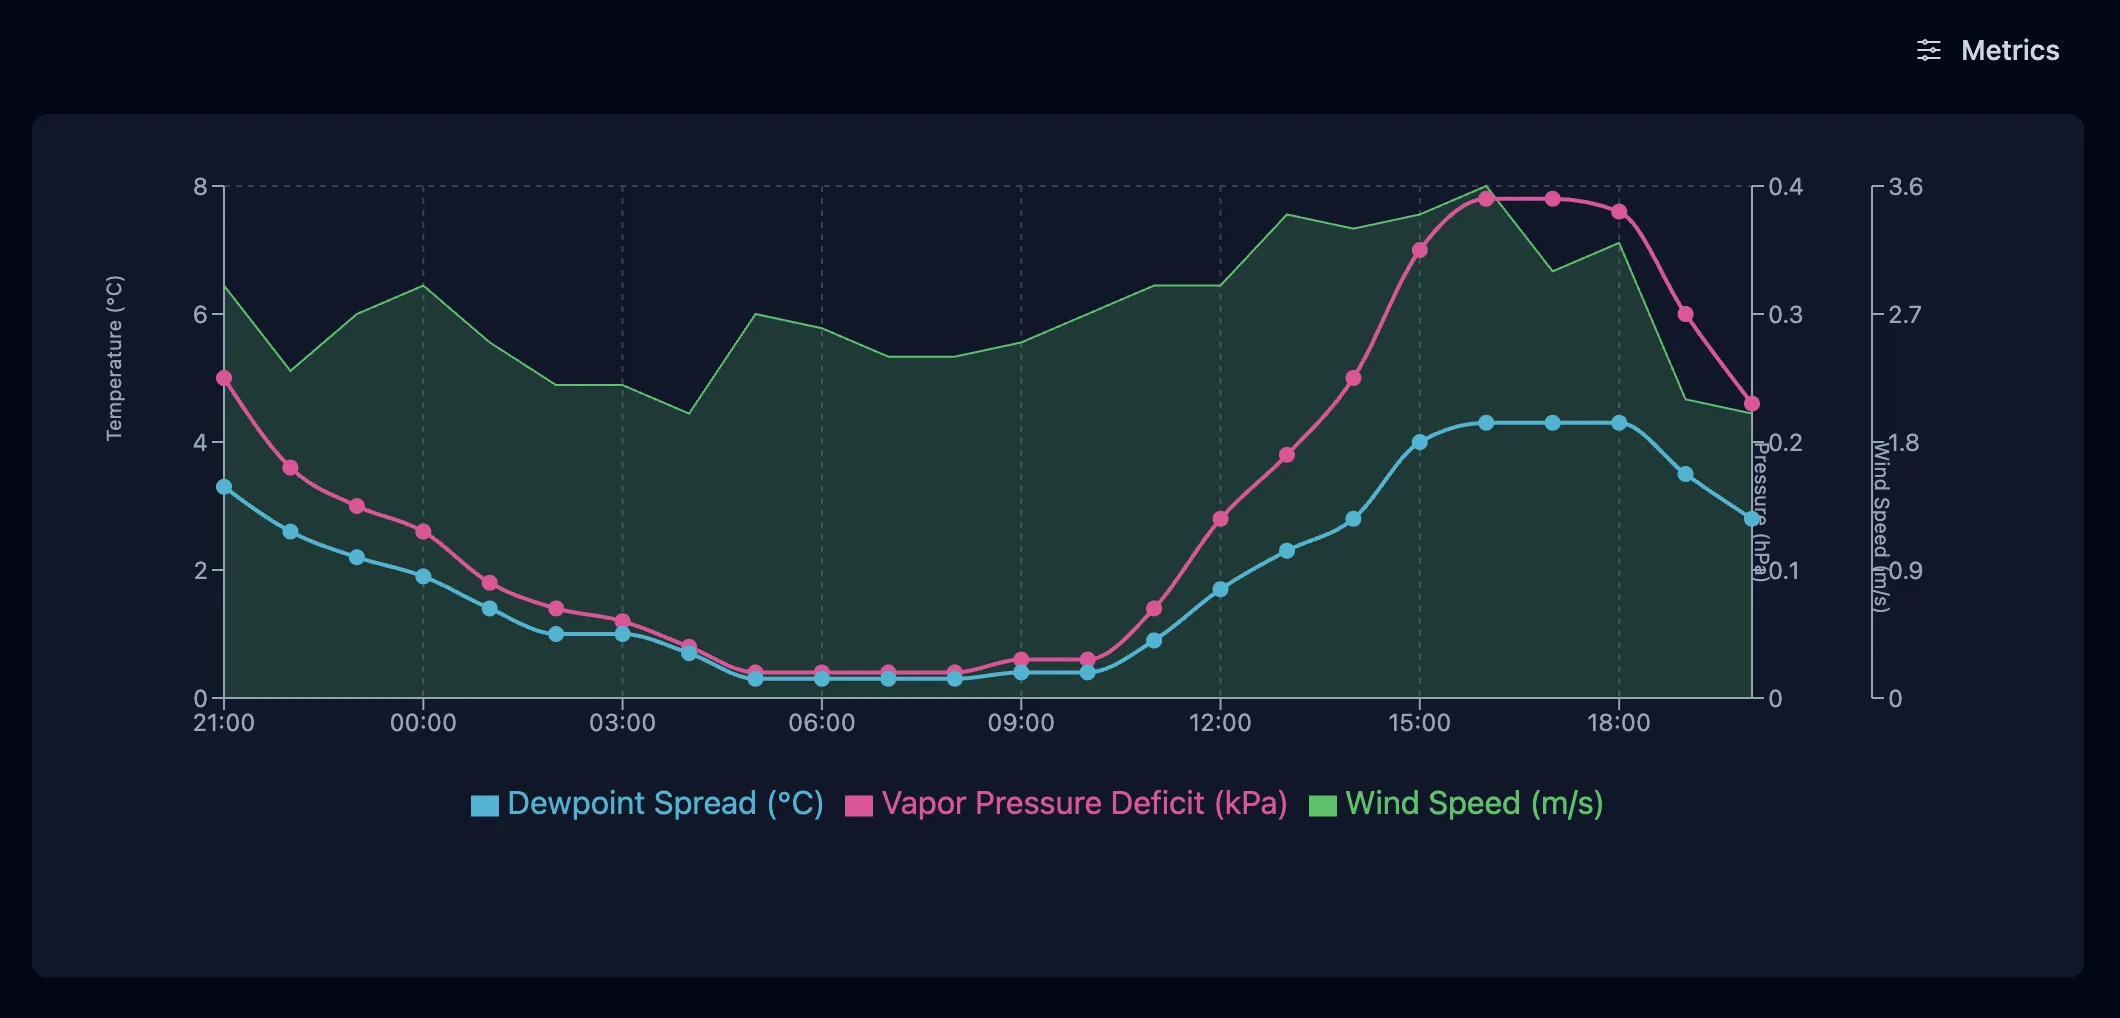
1. Dewpoint Spread (°C)
The gap between air temperature and dew point. A smaller gap means the air is closer to saturation.
- ≤ 2°C: Mist or patchy fog likely
- ≤ 1°C: Strong chance of fog
- ≤ 0.5°C: High risk of dense fog, especially near sunrise
2. VPD (Vapor Pressure Deficit, kPa)
VPD measures how “thirsty” the air is for moisture. Lower values mean the air is closer to saturation.
- ≤ 0.40 kPa: Supports fog formation
- ≤ 0.25 kPa: Strong conditions for dense fog
3. Wind at 10m (m/s)
Wind mixing destroys fog formation. Calm conditions are essential.
- ≤ 3–4 m/s: Suitable for mist
- ≤ 2 m/s: Ideal for dense fog
Bonus Factors
- Recent moisture: Light rain or drizzle in the last 6 hours often enhances woodland mist
- Terrain: Valleys, lakeshores, bogs, hollows, and river bends are fog magnets
- Cloud cover: Clear to thin high clouds help with nighttime cooling; low stratus can create mood even if it’s technically cloud, not fog
Reading Conditions in PhotoWeather
To analyze fog potential, you need to be signed in:
- Open Weather Chart for your location
- Enable Dewpoint Spread, VPD, and Wind
- Focus on the late night to early morning period, looking for:
- Dewpoint spread tightening to ≤ 2°C near dawn
- VPD dropping to ≤ 0.40 kPa
- Winds calming to ≤ 3–4 m/s in pre-dawn hours
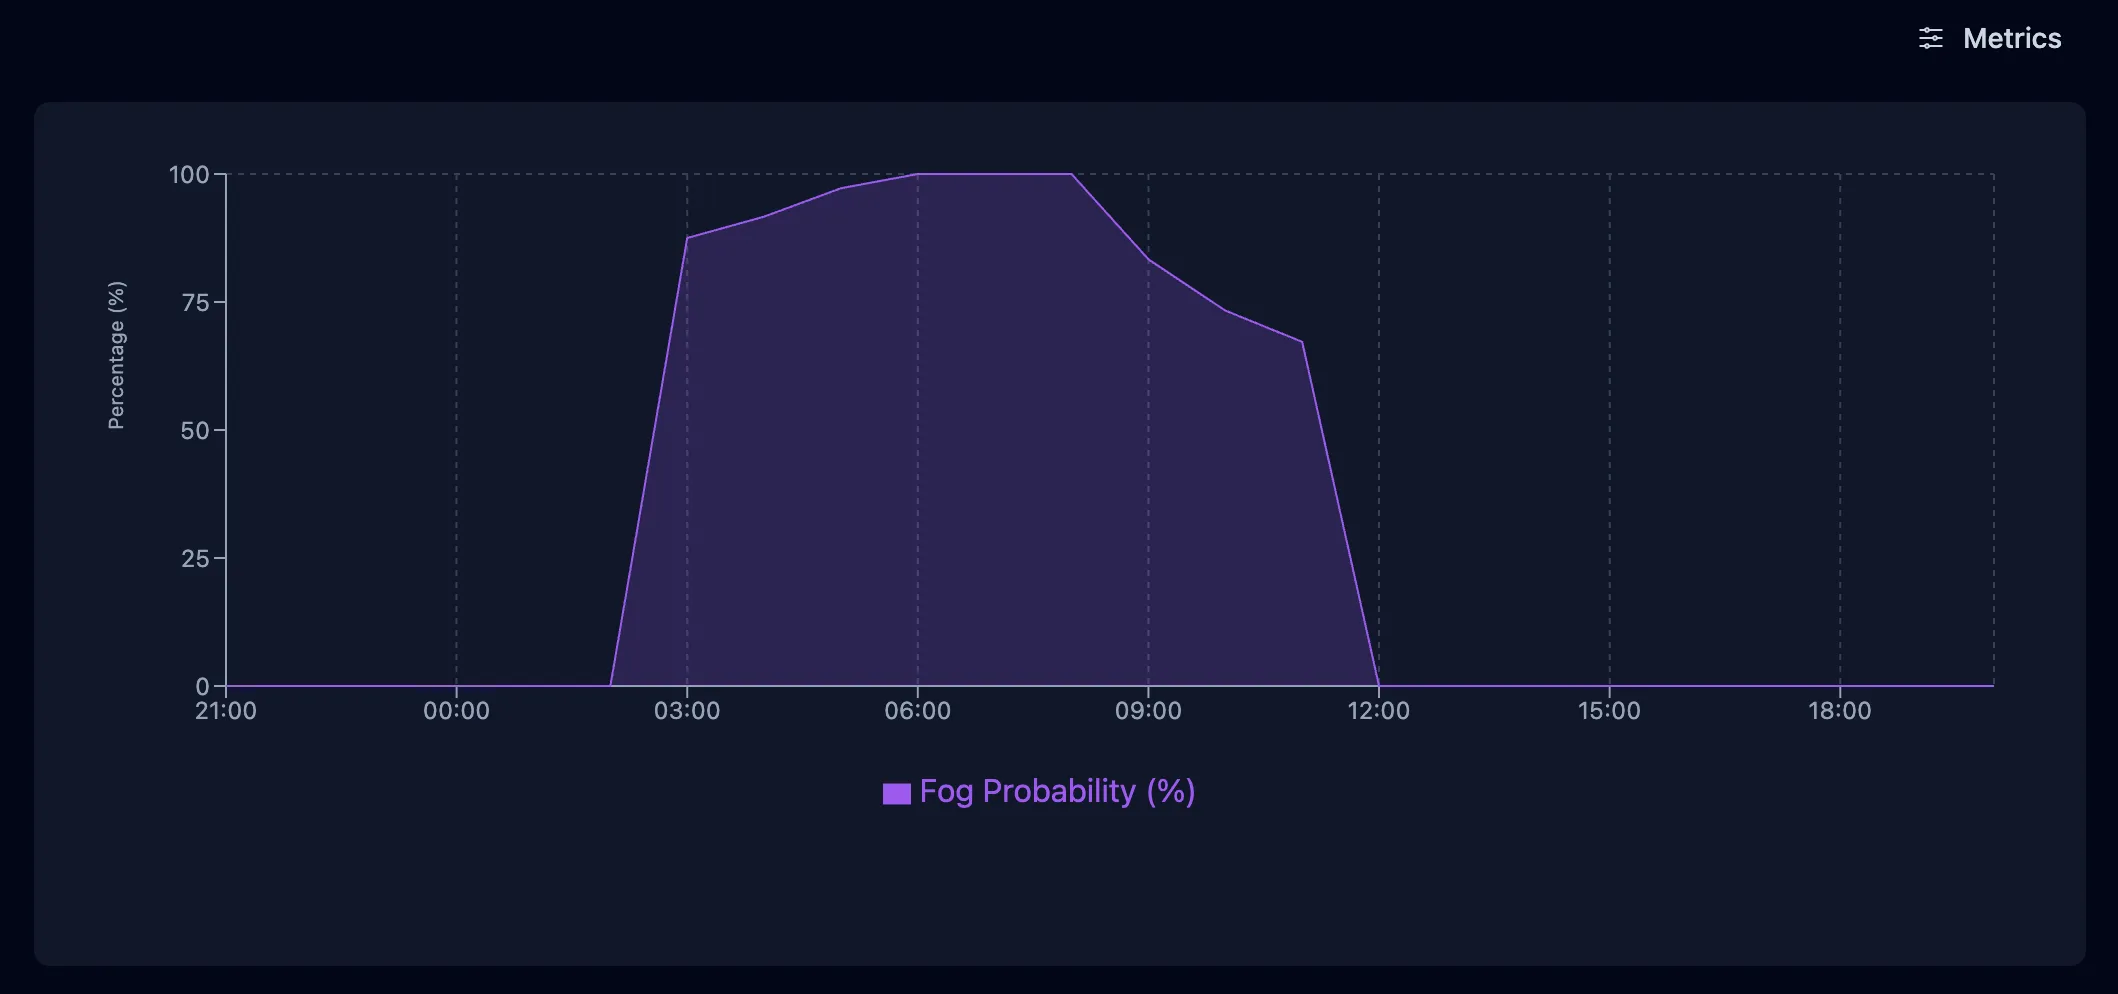
Pro users can toggle the Fog Probability overlay to see the prediction pre-calculated for you, up to 14 days in advance.
Setting Up Automated Alerts
PhotoWeather can monitor these signals and notify you when conditions align for free. No need to manually check forecasts at 4 AM.
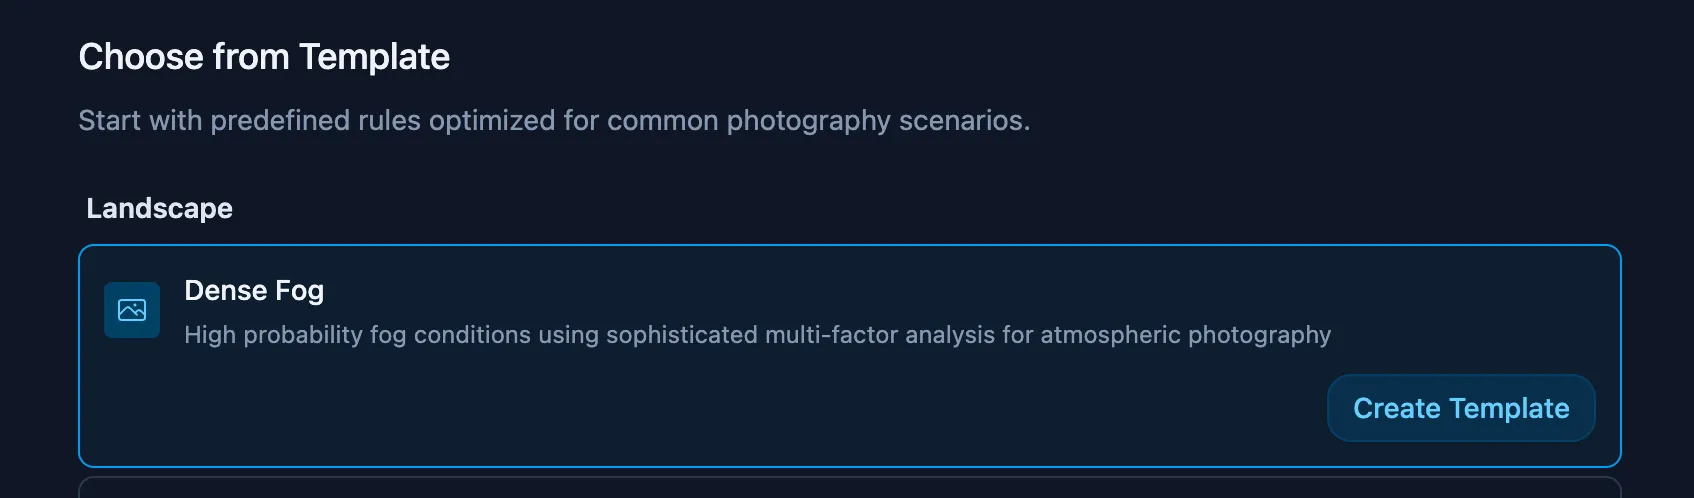
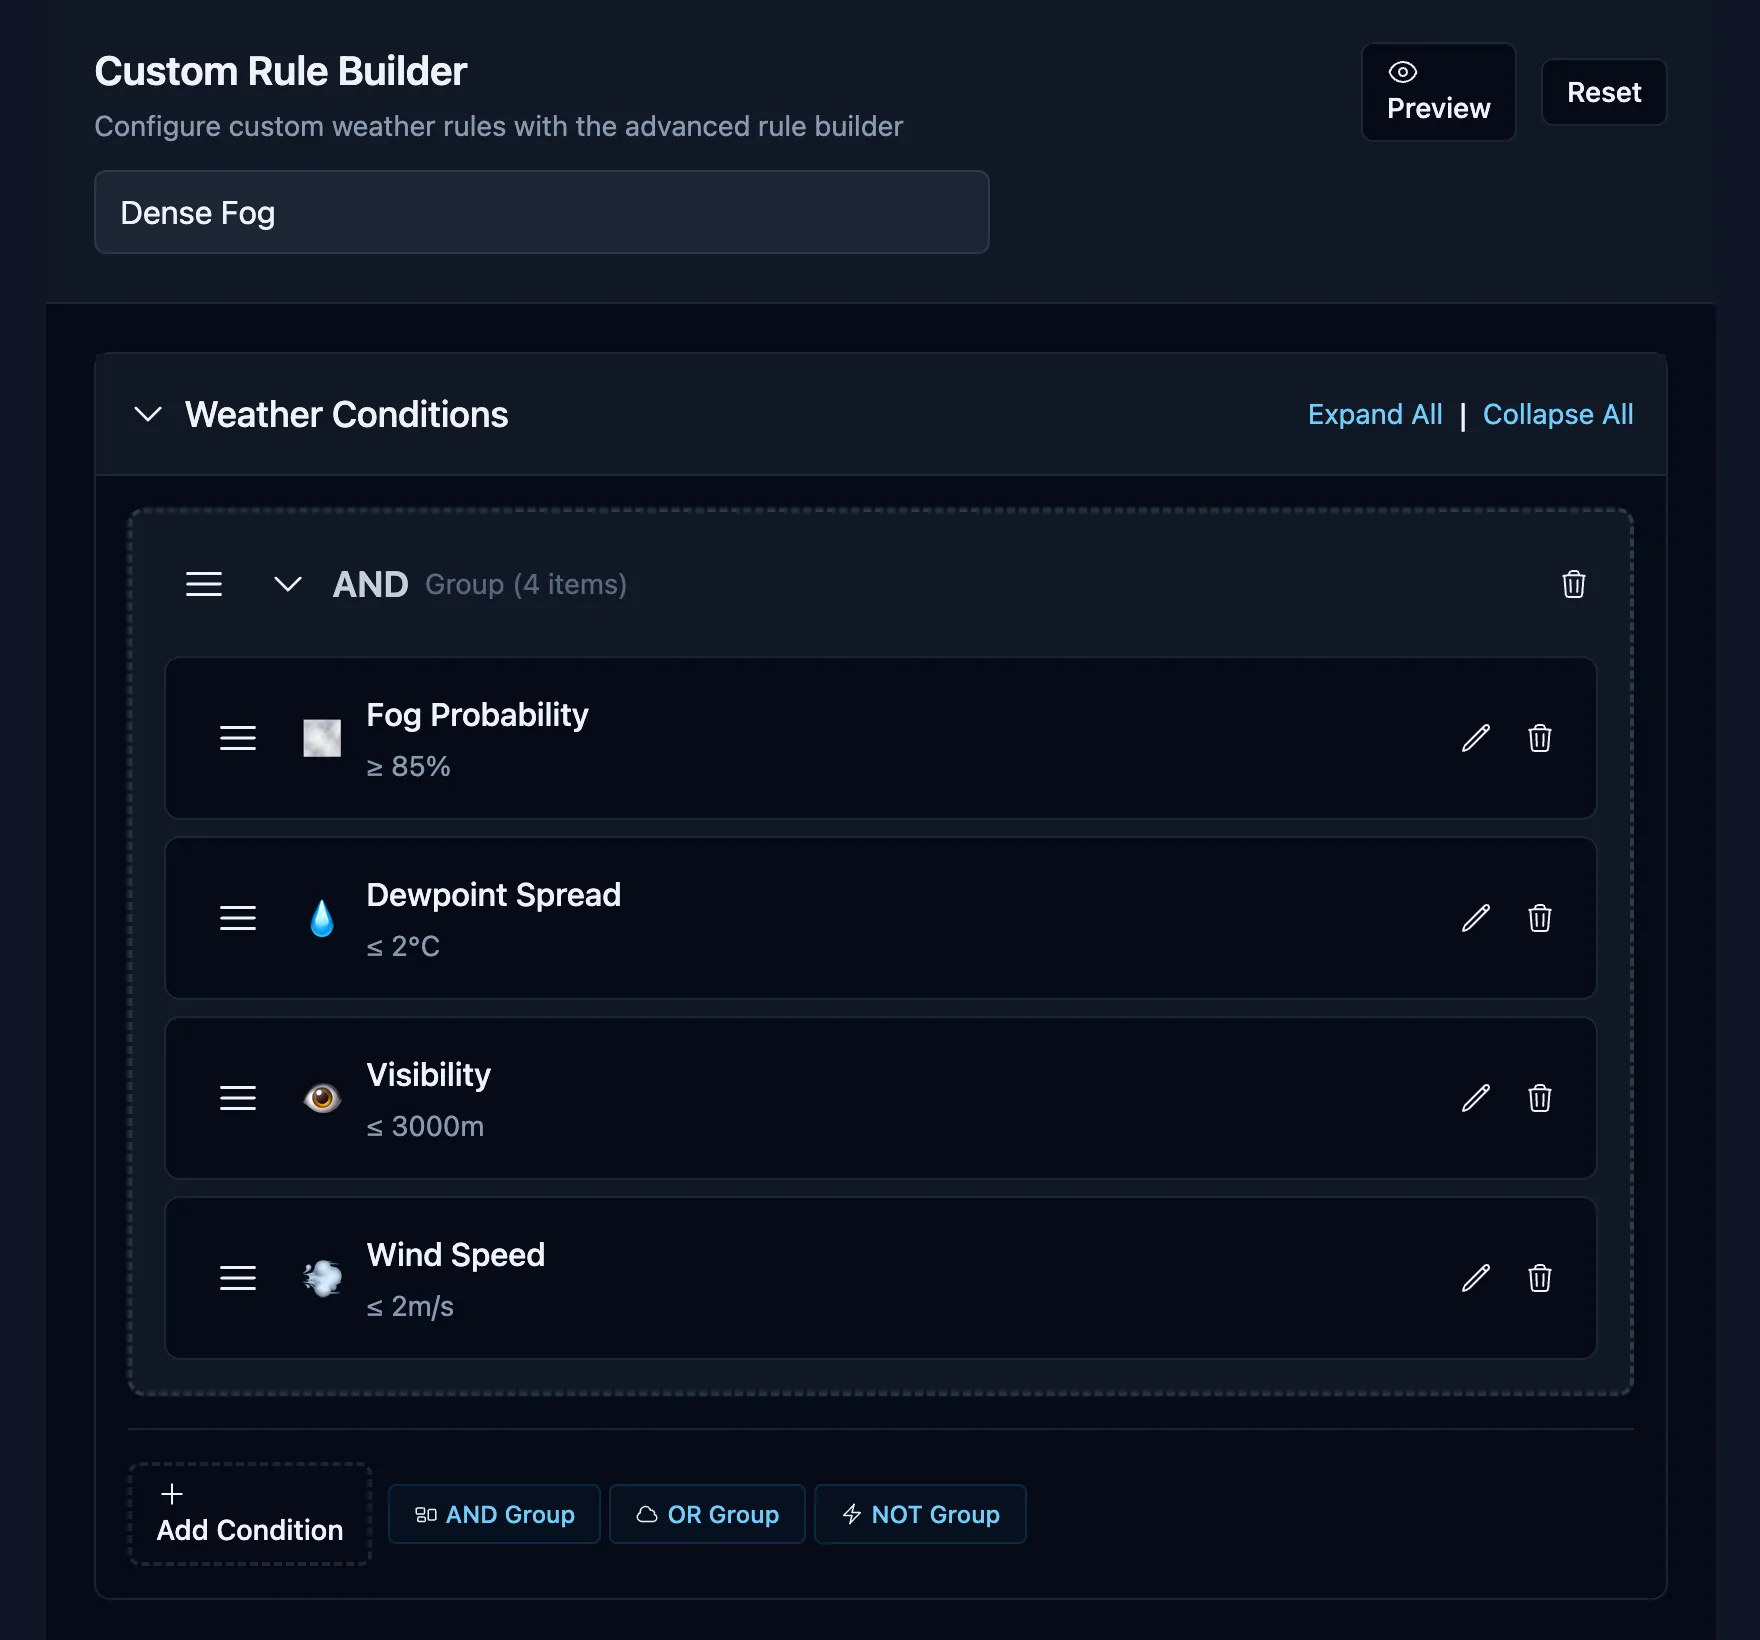
Dense Fog Template (Strict)
Perfect for thick ground fog and very low visibility mornings.
Setup:
- Go to Rules → Add Rule → Templates → Dense Fog → Create
- Enable the rule for any location that you want PhotoWeather to monitor for you
Fog or Mist Likely (Looser Settings)
Great for woodland atmosphere and scouting new locations.
Setup:
- Duplicate your Dense Fog rule
- Rename it “Fog or Mist Likely”
- Loosen the thresholds:
- Fog Probability: ≥ 70%
- Wind @ 10m: ≤ 3.5 m/s
- Dewpoint spread: ≤ 2.0°C
- VPD: ≤ 0.40 kPa
Run both rules in parallel—use the looser rule to get out more often, and the strict rule when you want guaranteed thick conditions.
Testing Your Rules
When adjusting thresholds, use the “Test against recent data” panel in the rule builder. This shows when your rule would have triggered over recent days, helping you:
- Validate settings against known fog events
- Avoid over-tightening rules that never fire
- Prevent loose rules that create too many false alerts
If you haven’t had recent fog in your area, expect few matches—that doesn’t mean your rule is wrong.
A Practical Timeline
Evening: Check that winds are forecast to calm overnight and skies won’t be completely overcast.
Late night: Look for dewpoint spread trending toward ≤ 2°C and VPD ≤ 0.40 kPa.
Pre-dawn: Spread ≤ 1–1.5°C, wind ≤ 3 m/s. Time to head out.
On location: Target valleys, bogs, and lakes. If low clouds appear instead of ground fog, adapt and shoot layers, silhouettes, and compressed telephoto scenes.
Field Techniques for Better Results
- Choose topography wisely: Pick areas where cool air naturally drains, not flat fields
- Create depth: Use tree lines, ridges, and structures to define fog layers
- Arrive early: The best shots often happen while fog is forming and lifting
- Monitor ground-level wind: If grass and reeds are moving, expect fog to dissipate quickly
- Bring versatile focal lengths: Wide angle for establishing shots, normal/short telephoto for layered compositions
When Conditions Aren’t Perfect
Wind slightly too high: Rely on your “Fog or Mist Likely” rule and work in sheltered valleys and woodlands.
Spread and VPD close but not quite there: Look for areas with recent moisture or proximity to water—you might find localized mist even when broader conditions don’t support fog.
Overcast night preventing radiation cooling: Treat it like a low-cloud morning and focus on forest mood rather than classic ground fog.
Model visibility seems inaccurate: Don’t rely heavily on visibility predictions unless you’ve validated them for your location. Stick to spread, VPD, and wind as your primary indicators.
Quick Reference
Threshold Guidelines
- Dewpoint spread: ≤ 2°C (likely), ≤ 1°C (strong), ≤ 0.5°C (dense)
- VPD: ≤ 0.40 kPa (likely), ≤ 0.25 kPa (strong)
- Wind @ 10m: ≤ 3–4 m/s (mist), ≤ 2 m/s (dense)
- Timing: Roughly two hours centered on sunrise (wider in winter)
Frequently Asked Questions
What dewpoint spread is “close enough”? 2°C or less suggests mist or patchy fog is likely. At 1°C or less, odds are strong. At 0.5°C or less, dense fog often appears around sunrise if winds stay calm.
Do I need Pro to forecast fog? No. A free account provides access to charts and templates for spotting good windows and setting alerts. Pro adds the Fog Probability overlay for more precise timing, and access to higher quality weather data with more frequent forecast updates.
How does rain affect fog formation? Light rain or drizzle before dawn can help by adding surface moisture. Heavy rain typically brings wind, which reduces fog chances.
Track Fog Conditions at Popular Destinations
See current fog probability at these atmospheric photography spots:
- Southern Finland Fog – Nuuksio, Torronsuo, Repovesi – lakes, bogs and forests
- Lofoten Fog – Dramatic mist over Norwegian fjords
- Dolomites Valley Fog – Famous mountain mist in the Italian Alps
- Tuscany Fog – Rolling hills and morning mist in Val d’Orcia
- Lake Bled Fog – Magical mist over Slovenia’s iconic lake
Each forecast shows dewpoint spread, VPD, and wind conditions alongside fog probability.
Get Started with PhotoWeather
Ready to catch the next fog window? Use our Fog Hunter template to get alerts when dense fog conditions are ideal for your locations. The template monitors dewpoint spread, VPD, wind, and fog probability to catch those magical misty mornings.
Getting Started
- Create your free account to access charts and templates
- Open Weather Chart and enable Dewpoint Spread, VPD, and Wind
- Add the Dense Fog template to your locations
- Create a “Fog or Mist Likely” variant for more opportunities
- Test your rules against recent data to fine-tune thresholds
- Consider upgrading to Pro for the Fog Probability overlay and hourly forecast updates
With these tools and techniques, you’ll move from hoping for fog to confidently planning around it. When you capture your first successful alert-driven shoot, document what worked—you’ll build a personal playbook that improves with every outing.