How to Photograph the Northern Lights: The Complete 2026 Guide
Master aurora photography with this comprehensive guide. Learn Kp index forecasting, real-time satellite tracking, camera settings, and when conditions actually favor shooting the northern lights.

How to Photograph the Northern Lights: The Complete 2026 Guide
You check the aurora forecast. It says there’s activity tonight. You drive two hours to your favorite dark sky spot, set up your camera in the freezing cold, and… nothing. Just clouds. Or the aurora is barely visible on the horizon. Or it’s still too light outside.
Sound familiar?
The problem isn’t bad luck—it’s that aurora forecasting is genuinely complicated. You need the right geomagnetic storm intensity for your latitude, clear skies across the whole sky dome, true darkness, and ideally a night without a full moon washing everything out. Miss any one of these factors and you’ve wasted an evening.
This guide will teach you everything you need to know: the science behind aurora, how to read forecasts properly, what the numbers actually mean, and how to set up alerts so you only head out when conditions are genuinely good.
You’ll need a free PhotoWeather account to follow along with the examples.
Understanding Aurora: The Science Behind the Lights
Skip to practical forecasting tips →
Before diving into forecasts and camera settings, understanding what creates aurora helps you predict when they’ll appear—and why forecasts sometimes fail.
The Solar Wind
The sun constantly ejects a stream of charged particles called the solar wind. These particles—mostly electrons and protons—travel through space at roughly 400 kilometers per second (about 1.4 million km/h). Under normal conditions, Earth’s magnetic field deflects most of this stream harmlessly around our planet.
But the sun isn’t constant. It goes through an 11-year activity cycle, and we’re currently near the solar maximum (2024-2026 peak). During active periods, the sun produces more intense events.
Coronal Mass Ejections (CMEs)
The most spectacular aurora displays come from CMEs—massive eruptions that hurl billions of tons of solar material into space. When a CME hits Earth (typically 1-3 days after eruption), it compresses our magnetic field and allows far more charged particles to enter the atmosphere.
CME impacts cause the Kp index to spike, sometimes dramatically. A typical night might see Kp 2-3; a strong CME can push it to Kp 7, 8, or even 9—making aurora visible from latitudes that normally never see them.
Why Aurora Happens at the Poles
Earth’s magnetic field creates a natural funnel. Charged particles that do penetrate our magnetosphere get channeled toward the magnetic poles, creating an oval-shaped “auroral zone” centered roughly on the magnetic (not geographic) north and south poles.
The stronger the geomagnetic storm, the larger this oval expands—pushing visible aurora toward lower latitudes. This is why Kp forecasts matter: they tell you how big the auroral oval is right now.
Aurora Colors Explained
Different colors come from different altitudes:
- Green (most common): Oxygen atoms at 100-300 km altitude
- Red: Oxygen at higher altitudes (300+ km)
- Blue and purple: Nitrogen molecules at lower altitudes
- Pink edges: Combination of nitrogen emissions at the curtain’s lower fringe
The specific colors you photograph depend on the storm’s intensity and your location relative to the auroral oval.
The Kp Index: Your First Aurora Metric
The Kp index measures geomagnetic storm intensity on a scale from 0 to 9. It’s published by NOAA’s Space Weather Prediction Center and updated every 3 hours.
Kp Scale Breakdown
| Kp Level | Storm Category | Who Can See It |
|---|---|---|
| 0-2 | Quiet | Only far north (65°N+): Tromsø, Fairbanks, northern Iceland |
| 3-4 | Minor storm | High latitudes (55-65°N): Reykjavik, Anchorage, northern Scotland |
| 5-6 | Moderate storm | Mid-latitudes (50-55°N): Seattle, Minneapolis, Edinburgh |
| 7-8 | Strong storm | Lower latitudes (45-50°N): Portland, Chicago, southern UK |
| 9 | Extreme storm | Rare—visible as far south as 40°N or below |
The Problem with Raw Kp Numbers
Here’s the catch: a Kp 5 forecast means nothing without knowing your latitude.
If you’re in Tromsø, Norway (69°N), a Kp 3 is exciting—you’ll likely see overhead aurora. If you’re in Seattle (48°N), you need Kp 6 or 7 just to see aurora on the northern horizon.
This is why PhotoWeather calculates a latitude-adjusted Aurora Activity score instead of just showing you raw Kp.
The Viewline Formula
Meteorologists calculate the aurora “viewline”—the lowest latitude where aurora becomes visible—using this formula:
Viewline Latitude = 66° - (2 × Kp)So:
- Kp 3: Viewline at 60°N
- Kp 5: Viewline at 56°N
- Kp 7: Viewline at 52°N
- Kp 9: Viewline at 48°N
If you’re above the viewline, you’ll see aurora on the horizon. If you’re 8° or more above it, you’ll see overhead aurora—the spectacular curtains directly above you.
The Quadratic Relationship
Aurora visibility doesn’t scale linearly with Kp. The relationship is closer to Kp²—meaning Kp 6 produces dramatically more visible aurora than Kp 4, not just “a bit more.”
This is why the difference between Kp 4 and Kp 6 feels enormous, while Kp 1 versus Kp 2 barely matters. PhotoWeather’s Aurora Activity score accounts for this quadratic scaling.
The Three Numbers That Actually Matter
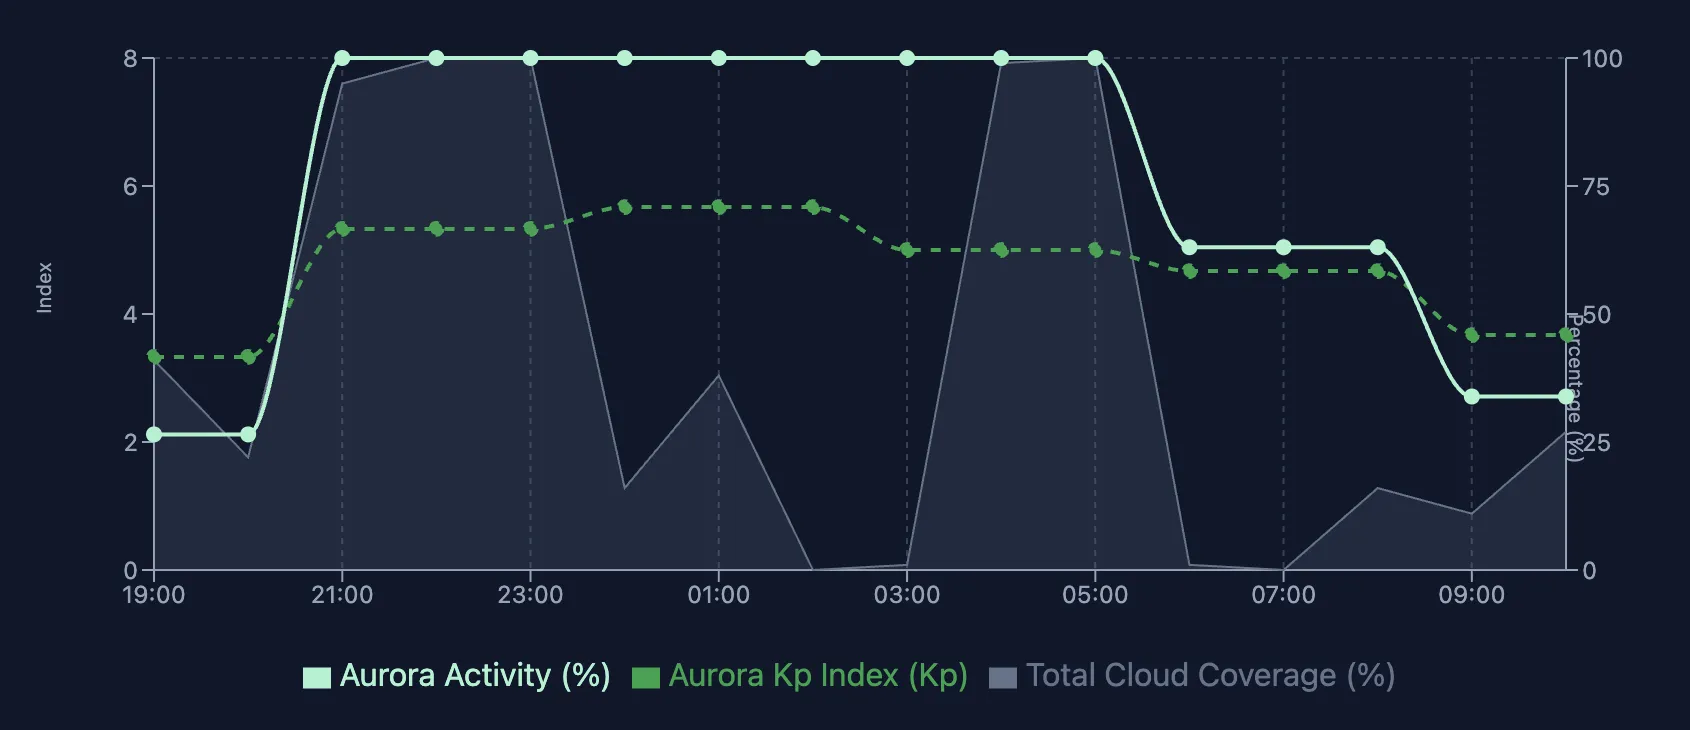
1. Aurora Activity (0-100%)
This is your latitude-adjusted score that accounts for where you actually are. A Kp 3 storm gets scored very differently in Tromsø versus Montana.
How to interpret it:
- 0-30%: Weak—unlikely to be visible
- 30-50%: Moderate—might be faintly visible, especially on camera
- 50-70%: Good—visible to the naked eye, excellent for photography
- 70-100%: Strong to excellent—spectacular displays likely
This number is far more useful than raw Kp because it’s personalized to your location and accounts for the quadratic Kp relationship.
2. Aurora Category: Horizon vs. Overhead
Based on your latitude and the current Kp, the system classifies expected visibility:
- None: Storm isn’t strong enough to reach your latitude
- Horizon: Aurora visible low on the northern horizon (viewline to viewline+8°)
- Overhead: Aurora directly above you (viewline+8° and higher)
This matters for composition planning:
- Horizon aurora: Use interesting foreground elements (mountains, lakes, trees)
- Overhead aurora: Shoot straight up for full-sky coverage, use ultra-wide lenses
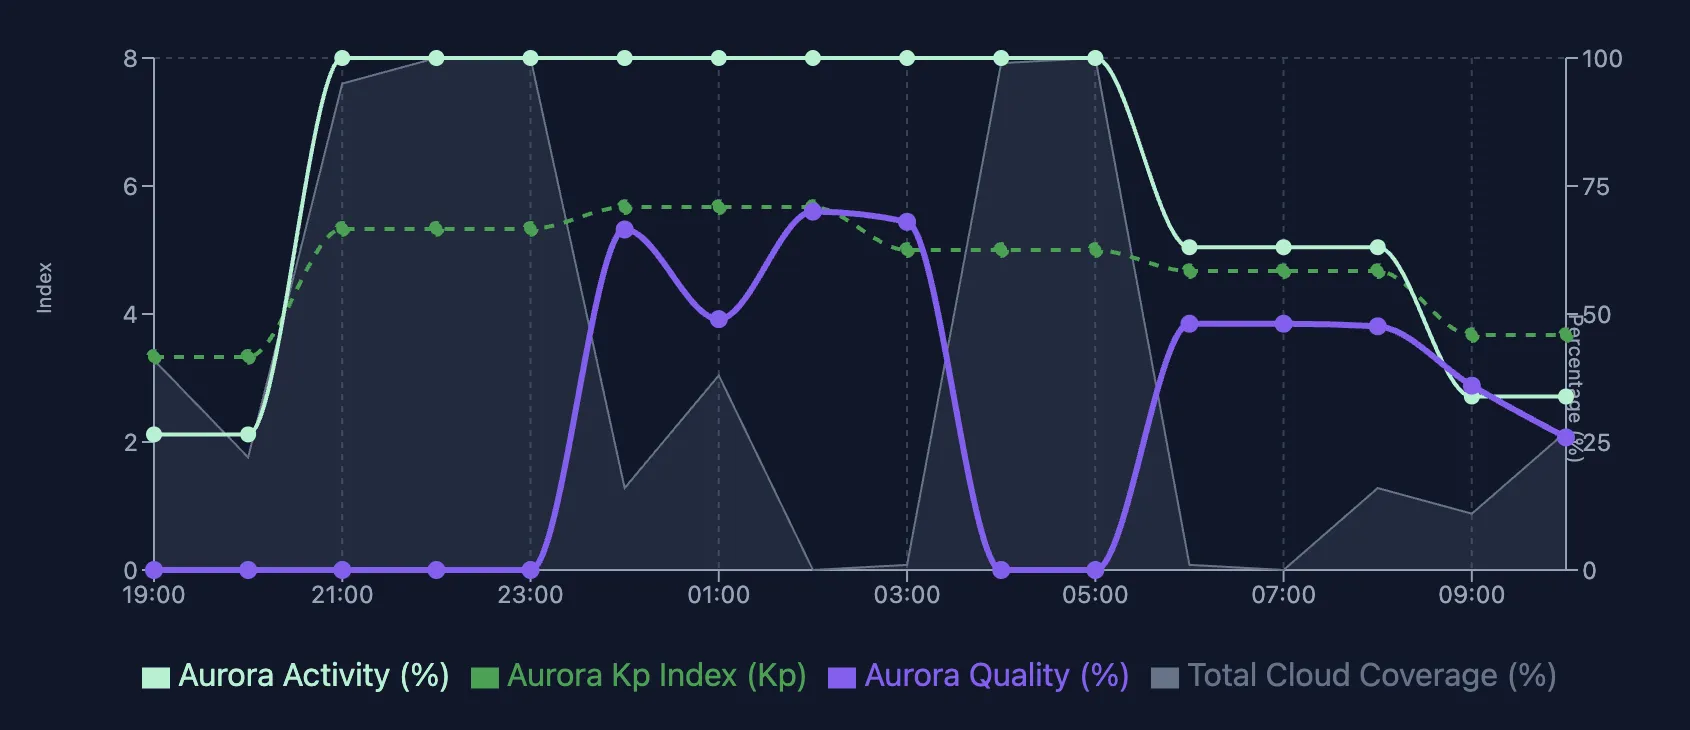
3. Aurora Quality Score (0-100%)
This is where it gets powerful. The Aurora Quality score combines everything into one number:
- Storm strength for your latitude (Aurora Activity)
- Whether the aurora would be overhead or on the horizon
- Whether it’s actually dark enough (aurora don’t show during twilight)
- Cloud coverage across the sky
- Atmospheric visibility
Hard cutoffs that zero the score:
- Sun above -6° (civil twilight—not dark enough)
- Cloud cover above 50%
- Storm not strong enough for your latitude
If you pass those gates, scoring considers:
- Base score: Up to 50 points from aurora activity
- Category bonus: +20 for overhead, +10 for horizon
- Darkness: Up to +15 for astronomical twilight (sun below -18°)
- Visibility: Up to +10 for clear air (15km+ visibility)
- Cloud penalty: Multiplier from 1.0 (clear) down to 0.3 (50% clouds)
How to read Aurora Quality:
- 0-30%: Don’t bother heading out
- 30-50%: Possible if you’re experienced and willing to gamble
- 50-70%: Good odds—worth planning a trip
- 70-100%: Drop everything and go
You can see this score overlaid on your weather charts and create alert rules based on it.
Real-Time Aurora Tracking: NOAA’s OVATION Prime
While Kp forecasts predict aurora activity days in advance, they’re educated guesses based on solar observations. The sun is unpredictable—CMEs can arrive stronger or weaker than expected, and timing can shift by hours.
This is where real-time satellite data changes the game.
What is OVATION?
NOAA’s OVATION Prime (Oval Variation, Assessment, Tracking, Intensity, and Online Nowcasting) model uses satellite observations to show where aurora is happening right now. Instead of predicting what might happen, it measures actual particle precipitation into Earth’s atmosphere.
Key characteristics:
- Updates every 5 minutes with fresh satellite data
- Shows the actual aurora oval position in real time
- Measures intensity in GigaWatts of auroral power
- Covers the next 30-90 minutes with high accuracy
Why OVATION Matters for Photographers
Kp forecasts might say “Kp 5 expected tonight.” But:
- The storm might arrive 3 hours late
- It might peak at Kp 4 instead of 5
- It might surge briefly to Kp 7 then fade
OVATION tells you what’s happening NOW. When satellites detect strong particle precipitation over your region, that’s your signal to go.
How PhotoWeather Uses OVATION (Pro)
For Pro users, PhotoWeather integrates OVATION data with Kp forecasts:
- 70% weight on satellite observation (what’s actually happening)
- 30% weight on Kp prediction (forecast context)
- 5-minute refresh for real-time decisions
This blending provides:
- Higher confidence when satellite confirms aurora activity
- False positive prevention—if OVATION shows nothing, the score drops 90% even if Kp looks promising
- “GO NOW” alerts when satellites detect a surge
The difference: Kp might tell you “tonight looks promising.” OVATION tells you “aurora is active RIGHT NOW over your area.”
Why Cloud Forecasts Are Tricky for Aurora
Unlike golden hour photography (where you mainly care about clouds on the horizon), aurora can appear across the entire sky dome. A point forecast showing “30% clouds” might mean:
- Thin clouds everywhere (manageable)
- Clear sky except for a solid bank in the north (blocking your view)
- Scattered clouds that won’t interfere
This uncertainty kills aurora trips.
Single-Point vs. All-Sky Cloud Analysis
Standard forecast: Checks cloud cover at your exact coordinates. Limited for whole-sky phenomena.
All-sky analysis (Pro): PhotoWeather samples cloud coverage in multiple directions:
- 8 compass bearings: N, NE, E, SE, S, SW, W, NW
- 3 distance rings: 25km, 50km, and 100km from your location
- 24 total sample points averaged for true sky-dome coverage
Real example: Your location shows 40% clouds, which seems borderline. But the all-sky analysis reveals those clouds are concentrated to the south. The northern sky—where you’ll be photographing—is clear.
This multi-point analysis is especially critical for aurora because the northern horizon is what matters most at mid-latitudes.
Free vs. Pro: What Aurora Features Are Available?
| Feature | Free | Pro |
|---|---|---|
| Aurora Activity Score | Yes | Yes |
| Kp Index Predictions | Yes | Yes |
| Aurora Quality Score | Yes | Yes |
| Alert Templates | Yes | Yes |
| Horizon/Overhead Classification | Yes | Yes |
| Visual Aurora Charts | Yes | Yes |
| OVATION Satellite Data | - | Yes |
| All-Sky Cloud Probes (24-point) | - | Yes |
| Forecast Range | 3 days | 14 days |
| Update Frequency | Every 6 hours | Hourly |
The core aurora forecasting—Activity, Quality, charts, and alerts—is free for everyone. Pro adds real-time satellite confirmation, whole-sky cloud analysis, and longer planning horizons.
Setting Up Alerts (So You Stop Missing Opportunities)
Instead of checking forecasts obsessively, let the system watch for you.
The Northern Lights Template
Check out the Northern Lights template to see exactly what conditions it monitors.
This is a ready-made alert rule that monitors all the factors we’ve discussed.
To set it up:
- Go to Rules → Add Rule → Templates → Northern Lights
- Review the trigger conditions (Aurora Quality ≥ 50%)
- Enable it for your locations
The rule triggers when there’s a genuine photography opportunity—not just aurora activity, but actual shootable conditions: dark enough, clear enough, and strong enough for your latitude.
To customize:
- Duplicate the template rule
- Lower the threshold to 40% for more alerts (you’ll gamble more)
- Raise it to 60%+ for only exceptional opportunities
- Use “Test against recent data” to see what opportunities it would have caught
When the rule triggers, you’ll get a notification showing the opportunity window, quality score, and key metrics—so you can decide if it’s worth heading out.
When to Actually Shoot
Best Months (Northern Hemisphere)
The aurora happens year-round, but you can only see it when it’s dark:
- September-October: Peak activity around the autumn equinox, reasonable temperatures, and genuinely dark nights returning after summer
- February-March: Second equinox peak, still cold but manageable
- November-January: Longest, darkest nights—maximum opportunities but brutal cold
- April-August: Limited or no darkness at high latitudes (midnight sun)
Solar cycle context: We’re currently near solar maximum (2024-2026), meaning more frequent strong storms. This is an excellent period for aurora photography, especially at mid-latitudes that normally require major storms.
Best Time of Night
Statistical peak is between 10 PM and 2 AM local time, but aurora can occur anytime it’s dark. The key factors:
- After astronomical twilight (sun 18°+ below horizon)
- Before morning twilight begins
- Magnetic midnight (roughly 11 PM - 1 AM) often shows strongest activity
Pro tip: If you’re using PhotoWeather alerts, you’ll get notified when conditions actually peak—which might be at 3 AM when the storm arrives.
Planning Horizons
- 14 days ahead (Pro): Start watching for promising windows, plan travel
- 3 days ahead (Free): Kp forecasts become reasonably reliable
- Same day: OVATION satellite data (Pro) confirms actual activity
- Right now: “GO NOW” alerts when conditions peak
Where to Go Based on Your Latitude
The Aurora Zones
| Your Latitude | Kp Needed | Example Locations | What to Expect |
|---|---|---|---|
| 65-70°N | Kp 1-2 | Tromsø, Fairbanks, northern Iceland | Regular aurora, even weak storms produce shows |
| 55-65°N | Kp 3-5 | Reykjavik, Anchorage, northern Scotland, southern Scandinavia | Good displays during moderate storms |
| 50-55°N | Kp 5-6 | Seattle, Minneapolis, southern Canada, Edinburgh | Need moderate-strong storms |
| 45-50°N | Kp 6-8 | Portland, Chicago, northern US states, southern UK | Only strong storms, but can be spectacular |
| Below 45°N | Kp 8-9 | San Francisco, New York, central Europe | Rare major storms only (few per solar cycle) |
Choosing Your Location
What to look for:
- Dark skies: Get away from city lights. Use a light pollution map.
- Clear northern view: No mountains, buildings, or trees blocking north
- Interesting foreground: Lakes (reflections), mountains, trees, old buildings
- Accessibility: Can you get there in winter conditions? Is the road plowed?
- Backup options: Have 2-3 locations at different elevations/cloud patterns
Scouting tip: Visit potential locations during daylight to find compositions. You don’t want to be stumbling around unfamiliar terrain in the dark when aurora appears.
Track Aurora Conditions Tonight
Want to see current conditions at these popular aurora destinations? Our regional forecasts combine Kp activity with local cloud cover and darkness:
- Finnish Lapland Aurora – Saariselkä, Inari, Utsjoki – directly under the auroral oval
- Norwegian Fjords Aurora – Lofoten, Tromsø, Senja – dramatic mountain backdrops
- Swedish Lapland Aurora – Abisko, Kiruna – famous for clear skies
- Iceland Aurora – Kirkjufell, Jökulsárlón, Þingvellir – volcanic landscapes
Each regional forecast shows which locations have the best conditions right now, with hourly updates for Pro users.
Camera Settings to Start With
Base Settings
| Setting | Starting Point | Adjust For |
|---|---|---|
| ISO | 1600-3200 | Brighter aurora = lower ISO; dim aurora = higher |
| Aperture | f/1.4 - f/2.8 | As wide as your lens allows |
| Shutter | 8-15 seconds | Faster (2-5s) if aurora is moving rapidly |
| Focus | Manual, infinity | Focus on stars or distant light, then tape it |
| White Balance | 3500-4000K | Adjust in post (shoot RAW) |
Adjusting for Aurora Brightness
Faint aurora (visible mainly on camera):
- ISO 3200-6400
- 15-20 second exposures
- Widest aperture
Moderate aurora (visible to naked eye):
- ISO 1600-3200
- 8-15 second exposures
- f/2.8 or wider
Bright, active aurora (vivid curtains):
- ISO 800-1600
- 2-8 second exposures (faster to freeze movement)
- Can stop down slightly for sharpness if needed
Lens Recommendations
- 14-24mm f/2.8: Ideal range for full-sky coverage
- 24mm f/1.4: Great for including more foreground
- Fisheye (8-15mm): Captures the entire sky dome
- Avoid: Long telephotos (you want wide views for aurora)
Essential Gear
- Sturdy tripod: Wind and cold make stability critical
- Intervalometer/remote: For timelapse and avoiding camera shake
- Extra batteries: Cold drains batteries fast—keep spares warm in your pocket
- Lens heater or hand warmers: Prevents frost on the front element
- Headlamp (red light mode): Preserve night vision
- Weather protection: Rain covers if conditions are uncertain
Focus Technique
- Arrive while there’s still some light, or find a distant artificial light
- Use live view at maximum zoom on a bright star or distant light
- Manually adjust focus until the point is sharpest
- Tape the focus ring so it doesn’t shift
- Take a test shot at high ISO, zoom in on stars to verify sharpness
Common Mistakes to Avoid
1. Chasing Kp Without Checking Your Latitude
A Kp 5 forecast excites everyone, but if you’re at 48°N, you might only see a faint glow on the horizon. Always check Aurora Activity or Aurora Quality scores for your specific location.
2. Ignoring Cloud Cover
A spectacular Kp 7 storm means nothing if your sky is overcast. Always check forecasts for your location AND surrounding areas. Be willing to drive to clearer skies.
3. Heading Out Too Early
Aurora needs darkness. If you arrive during civil twilight (sun only 6° below horizon), even a strong aurora will be washed out. Wait for true night—astronomical twilight (sun 18°+ below) is ideal.
4. Wrong White Balance Expectations
Aurora in photographs rarely looks exactly like what you saw. Cameras capture more color and detail than eyes perceive. Don’t try to “correct” aurora shots to look muted—embrace the vibrant colors.
5. Not Scouting Locations in Daylight
Fumbling around unfamiliar terrain in the dark wastes precious shooting time. Know your compositions, footing, and exit routes before the sun sets.
6. Single Location Tunnel Vision
Cloud patterns vary dramatically over short distances. Have backup locations at different elevations or 30-50km away. Check satellite cloud imagery, not just point forecasts.
Pro tip: Pro users can monitor multiple locations simultaneously and view the best opportunities across all of them on the PhotoWeather opportunity map—making it easy to see at a glance which of your spots has the clearest skies tonight.
7. Giving Up Too Early
Aurora activity fluctuates throughout the night. A quiet 10 PM can turn into spectacular displays at 1 AM when a CME finally impacts. If forecasts look good, stay out.
Common Questions
What Kp do I need for my city?
Here are specific examples:
| City | Latitude | Minimum Kp | Overhead Kp |
|---|---|---|---|
| Tromsø, Norway | 69°N | Any | Kp 1+ |
| Reykjavik, Iceland | 64°N | Kp 1 | Kp 3+ |
| Anchorage, Alaska | 61°N | Kp 2 | Kp 4+ |
| Edinburgh, Scotland | 56°N | Kp 4 | Kp 6+ |
| Seattle, USA | 48°N | Kp 6 | Kp 8+ |
| Chicago, USA | 42°N | Kp 8 | Kp 9 |
The Aurora Activity score handles this automatically for your saved locations.
Can I photograph aurora with my phone?
Modern phones (iPhone 14+, recent Samsung Galaxy, Pixel phones) can capture aurora with night mode. Results won’t match dedicated cameras, but you can absolutely get impressive shots. Use a phone tripod and enable the longest night mode exposure available.
How far in advance can I plan an aurora trip?
- 14 days (Pro): NOAA’s 27-day outlook provides rough guidance
- 3 days: Kp forecasts become reasonably reliable
- 24 hours: Forecasts are quite accurate
- Real-time: OVATION satellite data (Pro) shows current conditions
For trip planning, watch the 14-day forecast for promising patterns. But stay flexible—conditions can change rapidly, and the best aurora chasers keep monitoring right up until they head out.
Do I need Pro to forecast aurora?
No. The free tier includes full aurora forecasting:
- Aurora Activity scores (latitude-adjusted)
- Kp index predictions
- Aurora Quality score (the combined metric)
- Northern Lights alert template
Pro gives you:
- OVATION satellite data (real-time confirmation)
- All-sky cloud probe analysis (24-point sampling)
- 14-day forecasts (vs. 3 days free)
- Hourly updates (vs. every 6 hours)
The core conditions, charts, and alerts work for everyone.
What’s the difference between Activity and Quality?
- Aurora Activity: How strong is the geomagnetic storm for your latitude? (Just the storm, ignoring weather)
- Aurora Quality: Can you actually photograph it right now? (Factors in darkness, clouds, visibility, storm strength)
Use Quality for alerts—it only triggers when all conditions align. Use Activity when you want to understand storm strength independent of local weather.
Why is Quality showing zero when Activity is high?
Because something critical is missing:
- Not dark enough: Sun hasn’t dropped below -6° yet
- Too cloudy: Cloud cover exceeds 50%
- Wrong latitude: Storm isn’t strong enough to reach you
High Activity means the storm is strong. Zero Quality means you can’t see it from your location right now, even though the storm exists.
Does moon phase affect aurora photography?
Yes, in two ways:
- Bright moon washes out faint aurora (hard to see dim displays)
- Bright moon illuminates foreground (can actually help composition)
For the most vivid aurora shots, aim for new moon or thin crescent phases. But don’t skip a strong storm just because the moon is up—bright aurora will still show clearly.
I’m at low latitude—is it worth trying?
Absolutely, during strong storms. Some of the most dramatic aurora photographs come from mid-latitudes during major geomagnetic events. The aurora appears lower on the horizon, making foreground composition easier, and the rare occurrence makes them special.
Watch for Kp 7+ forecasts and be ready to drive to dark skies when they occur.
Get Started with PhotoWeather
Ready to chase the northern lights? Use our Northern Lights template to get alerts when aurora conditions align at your locations. The template monitors aurora activity, cloud cover, darkness, and visibility—catching those spectacular displays so you don’t have to constantly check forecasts.
Quick Start Checklist
- Create a free account
- Add your home location and any dark sky spots you frequent
- Open the weather chart and explore Aurora Activity, Kp Index, and Cloud Cover data
- Add the Northern Lights template to your locations
- Adjust the quality threshold if needed (40% for more alerts, 60%+ for exceptional only)
- Test it against recent data to see what opportunities it would have caught
That’s it. The next time there’s a legitimate aurora photography opportunity at your locations, you’ll know about it—with enough time to grab your gear and go.
Clear skies and good hunting.