Storm Photography: Reading the Drama Before and After
Learn to predict dramatic storm conditions, understand atmospheric instability, and build rules that catch the most photogenic severe weather while staying safe.
Storm Photography: Reading the Drama Before and After
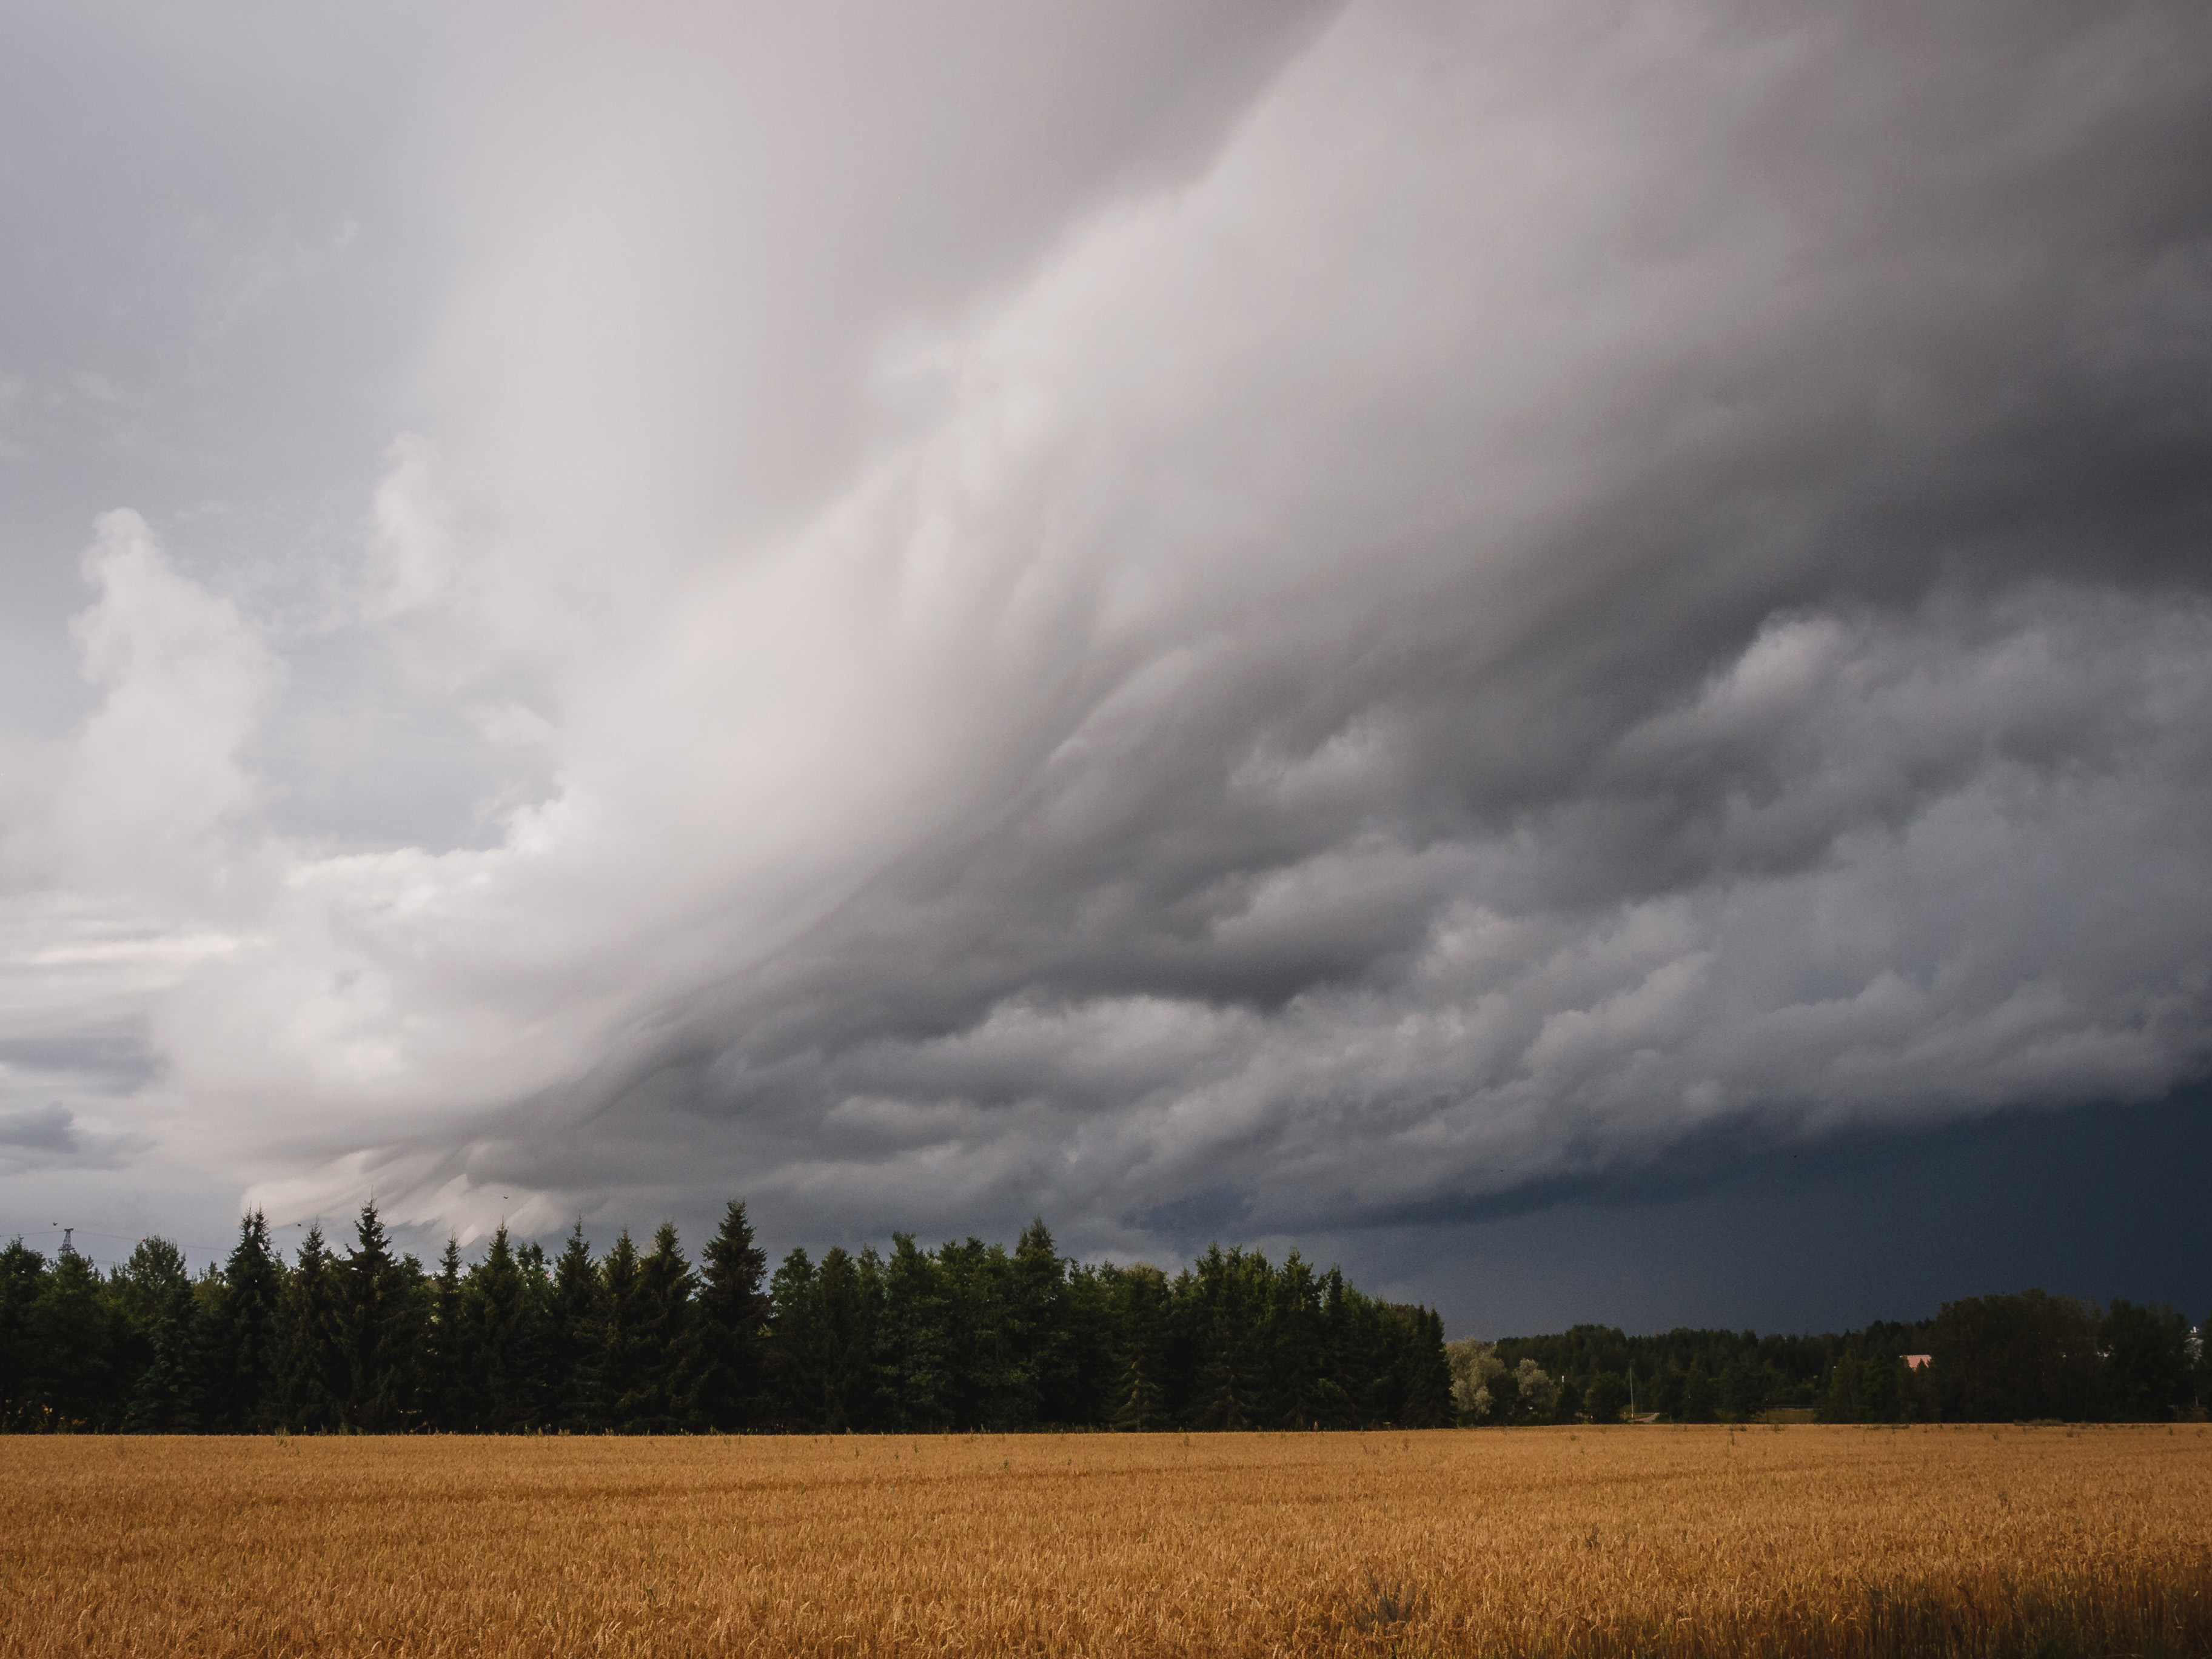
Few subjects in nature photography match the raw power and visual drama of storms. Towering thunderheads, anvil-shaped supercells, curtains of rain backlit by golden light—these scenes create images that stop people mid-scroll.
The challenge? Storms are dangerous, unpredictable, and fleeting. Being in the right place at the right time requires understanding what the atmosphere is doing, not just checking if rain is forecast.
This guide explains how to read storm signals, when to chase and when to stay home, and how to set up automated alerts for the most photogenic severe weather.
You’ll need a PhotoWeather account to follow along with the examples. Storm-specific fields require Pro tier.
Why Storm Photography Is Different
Generic weather apps tell you “thunderstorms likely” with a lightning bolt icon. That’s nearly useless for photography because it doesn’t tell you:
- Will the storm be visually dramatic or just gray rain?
- How organized will the storm structure be?
- What time will conditions peak?
- Is it safe enough to photograph?
Storm photography requires understanding atmospheric dynamics—the forces that create towering clouds, rotating updrafts, and the dramatic light that happens when storms interact with sunshine.
The Key Storm Indicators
CAPE: The Atmosphere’s Fuel Tank
CAPE (Convective Available Potential Energy) measures how much energy is available for thunderstorm development. Think of it as fuel—higher values mean more explosive potential.
| CAPE Value | What It Means | Photography Potential |
|---|---|---|
| < 500 J/kg | Stable atmosphere | No storm development |
| 500-1200 J/kg | Marginal instability | Weak convection, cumulus towers |
| 1200-2000 J/kg | Moderate instability | Organized storms developing |
| 2000-2500 J/kg | Strong instability | Excellent storm photography |
| > 2500 J/kg | Extreme instability | Dangerous but spectacular |
For photography, the sweet spot is typically 1500-2500 J/kg—enough energy for impressive storms without the extreme danger of supercell outbreaks.
Lifted Index: Atmospheric Stability
Lifted Index measures how unstable the atmosphere is. Unlike most weather values, negative numbers are what you want for storms.
| Lifted Index | Stability | Storm Potential |
|---|---|---|
| Above 0°C | Stable | No convection |
| 0 to -2°C | Slightly unstable | Developing conditions |
| -2 to -4°C | Moderately unstable | Good storm structure |
| -4 to -6°C | Strongly unstable | Spectacular storms |
| Below -6°C | Extremely unstable | Dangerous conditions |
When lifted index drops below -2°C, the atmosphere wants to overturn. Air rises rapidly, creating the towering cumulonimbus clouds that define storm photography.
Wind Shear: Storm Organization
Wind shear describes how wind changes with height. This is the secret ingredient that separates photogenic, organized storms from chaotic rain.
Higher wind shear means:
- Storms tilt, preventing rain from choking the updraft
- Cloud bases develop structure and texture
- Rotation becomes possible (the dramatic “spinning” look)
- Storms persist longer, giving you more shooting time
| Wind Shear (0-6km) | Storm Type | Visual Quality |
|---|---|---|
| < 6 m/s | Weak, disorganized | Messy, hard to photograph |
| 6-10 m/s | Some organization | Basic structure |
| 10-15 m/s | Good organization | Defined bases, structure |
| 15-25 m/s | Strong organization | Supercell characteristics |
| > 25 m/s | Supercell regime | Most dramatic but dangerous |
For the best photographs, look for wind shear in the 12-20 m/s range. This creates visually striking storm structure while keeping conditions manageable.
Storm Intensity: The Complete Picture
Reading individual metrics takes practice. PhotoWeather’s Storm Intensity score combines everything into a single 0-100 scale designed for photographers.
The score factors in:
- Precipitation intensity
- Wind speed and gusts
- Atmospheric pressure
- Visibility conditions
- CAPE (instability)
- Simulated radar reflectivity
- Wind shear (organization)
What the Numbers Mean
| Storm Intensity | Conditions | Photography Recommendation |
|---|---|---|
| 0-40 | Weak/developing | Early builds, wait for more |
| 40-55 | Marginal | Atmospheric drama building |
| 55-70 | Moderate | Good storm structure, photo opportunities |
| 70-85 | Strong | Excellent visuals, experienced chasers |
| 85-100 | Severe | Extreme conditions, maximum caution |
The 55-75 range is typically ideal for photography—dramatic enough to create compelling images while still offering reasonable safety margins.
The Clearing Storm: Photography Gold
Some of the most spectacular light happens not during storms, but as they clear. The “clearing storm” pattern occurs when:
- Rain moves through
- Clouds begin to break
- Low sun illuminates the scene
- Dramatic contrast between dark clouds and golden light
This creates the classic “God rays” effect, rainbow opportunities, and that moody, cinematic atmosphere.
Reading the Clearing Pattern
Look for these signals in the forecast:
- Precipitation decreasing: Rain tapering from heavy to light to none
- Sunshine duration increasing: Clear sky periods beginning to appear
- Cloud cover decreasing: Gaps forming in the overcast
- Timing with golden hour: Clearing happening 1-3 hours before sunset
The magic window is often 30-90 minutes after rain stops, when the sky still has dramatic clouds but light is breaking through.
Pressure Trends: Reading Approaching Systems
Barometric pressure tells you what’s coming:
- Falling pressure: Storm system approaching—time to prepare
- Low pressure (below 1005 hPa): Active weather, dramatic conditions likely
- Rising pressure: System departing—look for clearing patterns
- High pressure (above 1020 hPa): Stable conditions, no storm activity
Pro users can track pressure trends over time to anticipate system movement and plan shooting windows.
Safety First: When Not to Chase
Storm photography comes with real risks. Know your limits and respect the weather.
Dangerous Conditions
Stay home or retreat when:
- Wind gusts exceed 25 m/s (90 km/h)
- Hail is likely (watch for very high CAPE with strong shear)
- Visibility drops below 1000m
- Lightning frequency is extremely high
- Tornado risk exists (extreme wind shear + rotation)
- You can’t identify a clear escape route
Safe Shooting Practices
- Always have an escape route planned before shooting
- Never position yourself between a storm and your only exit
- Stay in your vehicle during active lightning
- Keep distance—telephoto lenses let you shoot safely from afar
- Check conditions continuously, not just at the start
- When in doubt, back off
Using the Storm Chaser Template
PhotoWeather includes a built-in template designed for storm photography that balances drama with safety.
What It Monitors
The Storm Chaser template watches for:
- Storm Intensity ≥ 55: Meaningful storm activity
- Cloud Drama Score ≥ 55: Visually interesting sky
- CAPE ≥ 1200 J/kg OR Lifted Index ≤ -2°C: Atmospheric instability
- Visibility ≥ 2500m: Clear enough to see and escape
- Wind Gusts ≤ 22 m/s: Manageable conditions
Setting It Up
- Go to Rules → Add Rule → Templates
- Find Storm Chaser under the Weather Drama category
- Click Create Rule
- Enable for locations where you want storm alerts
Tuning for Your Risk Tolerance
The template includes a sensitivity slider:
Loose settings (more frequent alerts):
- Storm Intensity ≥ 40
- Cloud Drama ≥ 40
- Includes developing storms and marginal conditions
Default settings (balanced):
- Storm Intensity ≥ 55
- Cloud Drama ≥ 55
- Organized storms with good structure
Strict settings (spectacular only):
- Storm Intensity ≥ 70
- Cloud Drama ≥ 70
- Significant storms with excellent visual potential
Start with default settings, then adjust based on your experience and results.
The Clearing Storm Template (Pro)
Some of the most spectacular photography happens not during storms, but as they clear. PhotoWeather’s Clearing Storm template uses trend rules to detect that magical transition—not just that rain stopped, but that conditions are actively improving.
What It Monitors
The Clearing Storm template combines historical and trend analysis:
Storm History:
- Recent precipitation ≥ 3mm in last 6 hours: Confirms a real storm passed through
- Current precipitation ≤ 1mm/hour: Rain has stopped or nearly stopped
Clearing Trends (the key differentiator): The template detects at least one of these improving patterns:
- Cloud cover decreasing at ≥3% per hour (sky breaking up)
- Storm intensity dropping at ≥5 points per hour (system weakening)
- Visibility improving at ≥500m per hour (air clearing)
Current Conditions:
- Visibility ≥ 5000m: Clear enough to see the drama
- Cloud cover 25-75%: Dramatic clouds remain, but gaps forming
- Sunshine ≥ 10 minutes/hour: Light breaking through
- Wind gusts ≤ 20 m/s: Manageable for shooting
Setting It Up
- Go to Rules → Add Rule → Templates
- Find Clearing Storm under the Weather category
- Click Create Rule
- Enable for locations where you chase storms
This template requires Pro because it uses trend rules to analyze weather patterns over time—tracking precipitation history and detecting clearing trends.
Why Trend Detection Matters
A basic rule can only check current conditions: “Is it raining now? Are there clouds?” The Clearing Storm template asks smarter questions:
- “Did it rain recently?” (checks the last 6 hours)
- “Is cloud cover decreasing?” (trend analysis)
- “Is the storm weakening?” (intensity trend)
- “Is visibility improving?” (trend analysis)
This trend awareness catches the precise transition window—the moment when conditions are actively clearing, not just when they happen to be partially cloudy. That transition is when you get dark storm clouds as backdrop with golden light breaking through to illuminate your subject.
Tuning the Template
Loose settings (catches earlier clearing stages):
- More current rain tolerated (≤ 2mm/hour)
- Wider cloud range (15-85%)
- Less sunshine required (5 min/hour)
Default settings (balanced):
- Rain mostly stopped (≤ 1mm/hour)
- Optimal drama range (25-75% clouds)
- Moderate sunshine (10 min/hour)
Strict settings (dramatic clearing only):
- Rain completely stopped (≤ 0.3mm/hour)
- Narrower range (35-65% clouds)
- Strong sunshine (20 min/hour)
Building Custom Storm Rules
Beyond templates, you can create rules tailored to specific storm photography styles.
Example: Afternoon Storm Drama
Target the classic late-afternoon thunderstorm buildup:
- Storm Intensity ≥ 55
- Cloud Drama Score ≥ 60
- CAPE ≥ 1500 J/kg
- Wind Gusts ≤ 18 m/s
- Visibility ≥ 4000m
- Time Window: 2 PM - 7 PM
This fires when atmospheric instability peaks in the afternoon with good visibility and manageable winds.
Example: Organized Supercell Structure
For photographers seeking the most dramatic storm structure:
- Wind Shear (0-6km) ≥ 15 m/s
- CAPE ≥ 2000 J/kg
- Storm Intensity ≥ 60
- Visibility ≥ 3000m
Wind shear is the key differentiator—it creates the organized, structured clouds that make supercells so photogenic.
Example: Clearing Storm Golden Hour
Catch that magical post-storm light:
- Storm Intensity: 30-60 (storms weakening)
- Cloud Cover: 40-70% (partial clearing)
- Time Window: sunset-3h to sunset
- Precipitation ≤ 2 mm/hour
This targets the transition period when storms are departing but dramatic clouds remain.
Example: Lightning Storm Distance
For photographing lightning from a safe distance:
- Storm Intensity ≥ 65
- Visibility ≥ 8000m
- Wind Gusts ≤ 12 m/s
High visibility means you can see storms from far away. Low wind gusts mean stable conditions for long exposures.
Reading Conditions in PhotoWeather
To assess storm potential, open the Weather Chart for your location:
- Enable CAPE, Lifted Index, and Storm Intensity (Pro)
- Check the Wind Shear indicators for storm organization
- Look at the Precipitation forecast for timing
- Review Visibility and Wind Gusts for safety
Focus on the afternoon and early evening hours when convective storms typically peak. Morning storms can happen but are less common and usually less organized.
The Storm Photography Timeline
Day Before
- Check long-range forecasts for storm potential
- Look for CAPE values building
- Note when pressure is expected to drop
- Identify potential locations with good vantage points
Morning Of
- Verify instability metrics haven’t changed dramatically
- Check wind shear forecasts for storm organization
- Plan your route and escape routes
- Pack gear, charge batteries, check memory cards
Afternoon
- Monitor conditions continuously
- Position yourself with storms in view but not overhead
- Watch for visual cues: towering cumulus, darkening bases
- Be ready to move as conditions evolve
During the Event
- Keep checking updated forecasts
- Maintain safe distance
- Photograph actively—conditions change fast
- Know when to retreat
After
- Look for clearing patterns and post-storm light
- Chase rainbow opportunities
- Capture the aftermath and mood
- Review what worked for next time
Field Techniques
Positioning
- Shoot from the flank: Side angles show structure better than head-on
- Use high ground: Elevation gives you a better view of storm bases
- Include scale: Foreground elements show how massive storms are
- Watch the updraft: The most dramatic structure is usually on the leading edge
Camera Settings
- Aperture: f/8-f/11 for sharpness across the frame
- Shutter speed: Fast enough to freeze cloud motion (1/250+) unless deliberately blurring
- ISO: As low as conditions allow
- Focus: Manual focus on cloud features or use back-button focus
Composition
- Leave room: Give storms space in the frame to show scale
- Horizon placement: Low horizons emphasize sky drama
- Leading lines: Roads, fences, and fields draw the eye into storms
- Contrast: Dark clouds against light areas create impact
Quick Reference
Key Thresholds
| Metric | Photo-Worthy | Excellent | Dangerous |
|---|---|---|---|
| CAPE | > 1200 J/kg | 2000-2500 J/kg | > 3000 J/kg |
| Lifted Index | < -2°C | -4 to -6°C | < -7°C |
| Wind Shear | > 10 m/s | 15-20 m/s | > 25 m/s |
| Storm Intensity | > 50 | 60-75 | > 85 |
| Visibility | > 3000m | > 5000m | < 1000m (retreat) |
| Wind Gusts | < 15 m/s | < 12 m/s | > 22 m/s |
Best Timing
- Primary: 2 PM - 7 PM (peak convective activity)
- Secondary: Post-storm clearing, any time
- Avoid: Pre-dawn (convection rare without frontal forcing)
Template Comparison
| Template | Best For | Storm Intensity | Risk Level |
|---|---|---|---|
| Storm Chaser (loose) | Learning, frequent alerts | ≥ 40 | Lower |
| Storm Chaser (default) | Balanced photography | ≥ 55 | Moderate |
| Storm Chaser (strict) | Spectacular storms | ≥ 70 | Higher |
Frequently Asked Questions
Do I need Pro to photograph storms?
Basic storm photography is possible with free tier using cloud coverage, wind, and precipitation data. However, the powerful indicators—CAPE, Lifted Index, Wind Shear, and Storm Intensity—require Pro. These metrics make the difference between educated chasing and guesswork.
What’s the most important metric?
Storm Intensity is the single most useful number because it combines multiple factors. If you had to watch only one metric, that’s the one. For understanding why storms are dramatic, CAPE and wind shear explain the physics.
How far in advance can I predict storms?
Convective storms are harder to predict than frontal systems. General storm potential can be seen 3-5 days out, but specific timing and location become clearer 24-48 hours before. Same-day monitoring is essential.
Is spring really the best season?
Spring has the highest wind shear in many regions, creating the most organized, photogenic storms. However, summer has higher CAPE values and more frequent afternoon storms. Both seasons offer opportunities.
Can I photograph lightning safely?
Yes, with proper precautions. Stay in your vehicle, use a telephoto lens to maintain distance, and never shoot during the most active phase when lightning is striking nearby. Tripod and remote release let you shoot without direct exposure.
What if the storm isn’t as dramatic as forecast?
Weather forecasting has uncertainty. Use these events as learning opportunities—note what the conditions actually looked like and compare to what was forecast. Over time, you’ll develop intuition for how forecasts translate to real conditions in your area.
Get Started with PhotoWeather
Ready to chase dramatic storms? Use our Storm Chaser template to get alerts when storm conditions are photogenic and safe. The template monitors storm intensity, cloud drama, atmospheric instability, and visibility to catch those spectacular systems while keeping you out of dangerous conditions.
Getting Started
- Create your account and add locations where you want to chase storms
- Open Weather Chart and enable Storm Intensity, CAPE, and Wind Shear (Pro)
- Add the Storm Chaser template to your storm-prone locations
- Study the charts to understand what different values look like
- Start with the template on default settings
- Adjust sensitivity based on your results and risk tolerance
Storm photography rewards preparation, patience, and respect for the weather. With the right tools to read atmospheric conditions, you can chase intelligently—putting yourself in position for dramatic images while staying safe.
When you capture your first alert-driven storm shoot, document everything: what the metrics said, where you positioned, what worked and what didn’t. You’re building a personal playbook that will improve with every chase.